Flyin' Miata Stage 1 turbo system for 2006-15 Miatas
Exclusive to Flyin' Miata!
Couldn't load pickup availability

Collapsible content
Description
Flyin' Miata is known for their well-engineered, complete, emissions legal, high quality turbo systems for NA, NB and ND Miatas. And now this same level of excellence is available for the NC chassis!
We started from the ground up to design a turbo system that would meet our standards. It had to be emissions legal everywhere - including California. It had to be durable. It had to be easy to install. It had to have smooth power delivery and feel like a factory car. We tested multiple cars for months on the street and track, on cross-country drives, at elevation, at sea level and at multiple boost levels. And now it's here.
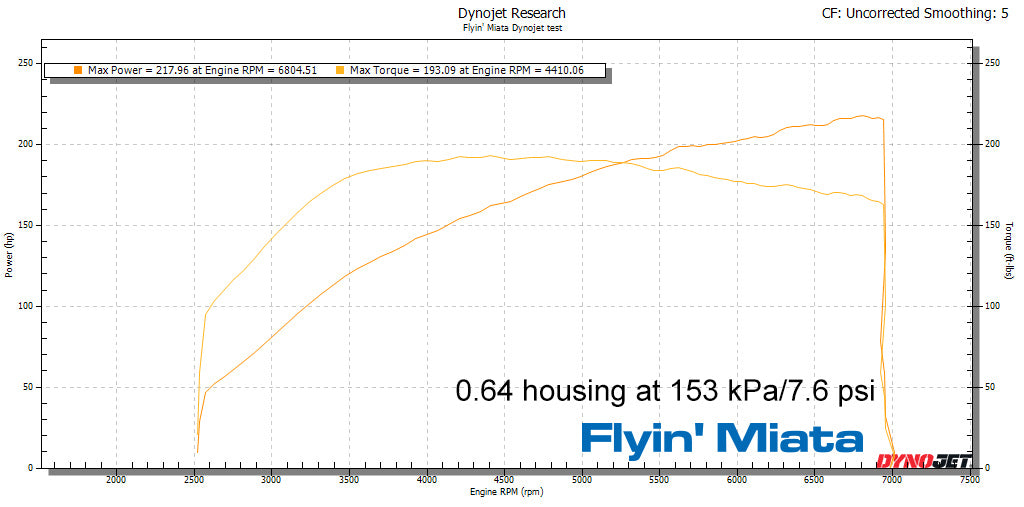
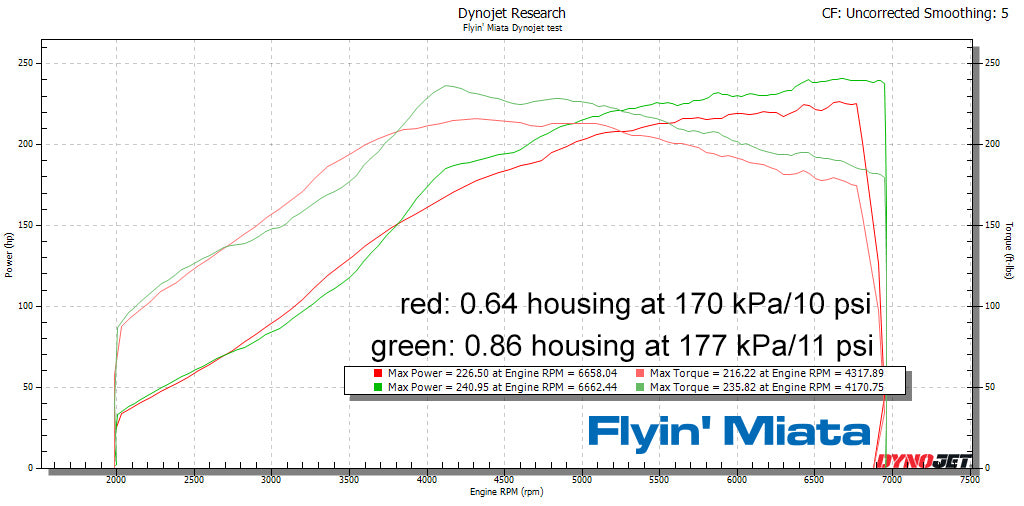
8 psi of boost out of a GT2860RS turbo means roughly 220 hp at the wheels on the stock 2.0 engine. 11 psi will produce approximately 240 hp at the wheels.
We offer the system with a choice of turbine housings: the larger 0.86 A/R will put less stress on the cooling system on track while the smaller 0.64 A/R offers extremely quick response.
The engine calibration was done by Calibrated Success, an OE-level calibrator that is on a different level from what has been seen in the Miata world before. The car drives like a factory car, with no bumps or weird hesitations. Careful attention was paid to catalytic converter health - this goes far beyond simply trying to reach a certain air/fuel ratio. The tune and hardware is designed to be as durable, powerful and clean as possible. There is no back and forth to tune your car, you simply load the calibration in and you're done. The MAF assembly and cold-side tubing was designed for ideal driveability - airflow through the MAF was designed for a smooth laminar flow for best results. Boost is set by the wastegate with no need for a secondary boost controller.
The cast turbine outlet has a constantly increasing cross-sectional area to ensure good flow and provides good clearance to other hard points for both durability and ease of installation. It terminates in a 4" V-band where it mates to the rest of the downpipe.
The stock catalytic converter is retained. We can either provide a complete downpipe with a brand new factory cat inside or you can weld the included fitting to your existing catalytic converter. Both options are emissions legal. We do not offer a cat delete option.
To make it easy to install, we designed single-piece formed hoses and custom hard lines to quickly connect to the stock components. This means fewer points of failure and perfect fitment. We paid careful attention to the cooling system design and water flow, making it as efficient as possible and taking lessons from the OEs as well as our own experience with other Miatas. We also tested the system extensively on track and the street, including 45 minute uninterrupted sessions at High Plains Raceway.
The manifold, turbine outlet, airbox and metal intercooler pipes are Cerakoted to handle high heat and retain their good looks over time. The intercooler has a thermal dispersion coating to give maximum cooling with better durability than bare aluminum. There is a custom turbo blanket for the turbo to protect brake lines and the plastic valve cover from heat. There are small details everywhere, such as a finishing cover for the sound tube hole.
The stock battery is retained inside a custom battery box. The air intake is a true cold air design, with intake temperatures at ambient. The only permanent modification to the car is a single hole in the front bulkhead near the radiator. We provide a template to make this easy - which doubles as an escutcheon for a clean finish.
Notes:
- We recommend an 8 psi boost limit on 2006-08 cars as well as automatic cars due to their cast engine internals. Yes, the kit works on automatics.
- The redline is the same as stock. The dyno charts show a 7000 rpm NC1 redline as that car was running NC1 engine management.
- The washer bottle is relocated. This new location will only fit with the standard US washer bottle (Mazda part NE51-67-481A, available from Flyin' Miata). The larger bottle (NE52-67-481A) used in some other countries will not fit.
- The boost level is set with wastegate preload. This is what we recommend for cars operating at or near sea level. Cars at altitude can use a manual boost controller to get slightly quicker boost rise and the ability to adjust boost more easily.
- We have confirmed that it will NOT fit with RHD cars.
- CARB EO #D-601-6
2.5 information: we have not tested this yet although we believe it should fit if you use drop mounts. We cannot provide a tune for a 2.5 application at this time but may be able to do so in the future.
Install and technical videos are available on our YouTube channel.
Note that this product may take a few days to ship as it's fairly complex to assemble and pack.
Instructions
Shipping
What does it fit?
Fits: 2006-2015, 2007-2015 PRHT
Emissions
50 state legal!
CARB EO: D-601-6
Warranty
1 year
SKU
2015 NC GT PRHT ~17k miles garage baby when I got my hands on it. Dyno'd stock, and then post turbo. 0.64 A/R. This is real data. The same dyno, DynoJet 248. Seems a little optimistic... But dynos will vary. But it is showing 90%+ power increase with with turbo! The stock car was baselined, a decent summer day 70's maybe? The green line is stock. The red line is ~174kPa / 11psi. The blue line is ~8psi. Note: it was cold(!) on the turbo runs! In the low 20's outside, and in the dyno house he had it all closed up and heated somewhat before I arrived but the bay door was opened. I may do a hot weather dyno at some point which should show lower numbers (cold days vs hot days the butt dyno knows this). Starts spooling well under 3k RPM. Spins the tires 2nd gear in a straight line when boost kicks in fully (4-5 kRPM) when conditions permit! Yes a bit of $$$ but well worth every penny. Drives flawlessly as advertised, like it came from factory. Set the wastegate boost for sea level, and cranked it up with a TurboSmart manual boost controller for altitude for ~174kPa @ 5300 feet elevation. Of course these numbers all will vary based on intercooler efficiency, air temps, engine temps, etc. I am extremely happy. Also note the stock clutch could not hold the turbo during certain conditions, upgraded to FM stage 1 clutch and after break in no more issues.
I’m not much for writing reviews, but I think this kit and this company deserve recognition for their efforts. They’ve cleverly designed it so that when one mashes the throttle on their Tugboat, a smile appears on the faces of those in the cockpit. Fascinating, Captain. Trekkies will get the reference.
Certainly, you can believe what other reviews say about performance and drivability. From an installation standpoint, I will tell you it is very complete, well thought out and documented but it doesn’t put itself together. I’m kinda fussy and like things done “just so”, thus I added some elements I thought would make it a “once and done” kind of deal.
1.New stock flywheel and FM “Level 1” clutch and pressure plate.
2. Aluminum high-capacity radiator, also from FM.
3. Synthetic lube in transmission and differential.
4. Aluminum power steering reservoir.
5. Aluminum expansion tank for cooling system
6. Pre-modified catalytic converter
I sometimes make projects more complex… just because I can. It’s how I’m wired, I guess. I encountered some challenges along the way which I detail here. I suspect you'll have to copy and paste:
https://grassrootsmotorsports.com/forum/build-projects-and-project-cars/pahrump-gets-boosted/282494/page1/
Just so this isn’t like other reviews, I’ll ask and answer some questions that folks might ask.
Q. That’s significant money. Is it worth it?
A. For me, yes. I’d rather modify a car than buy one off-the-shelf. I enjoy the work.
Q. Is it everything you imagined?
A. And then some.
Q. Given a choice, would you do it again?
A. Yep, I would. Pahrump, the Tugboat, is my fun car and this made it more so.
If you’re on the fence and can invest the time and money, I just don’t see how someone could be disappointed in the result.
Installation is well documented both in video and written form. The most challenging parts of the installation are due to a lack of space. FM did a great job providing tips for access. The key is patience, and trying different tools and angles of attack. Mirrors, extended magnets, and various socket extensions are highly recommended. The installation took me and the occasional helper four days doing one step at a time and a couple trips to the local auto parts store (no lift). With a lift, a dedicated helper, and a lower amount of distractions, this install could be done in two long days (not including the welded cat). Initial operation was issue free. All we had to do is dial in the boost setting (also documented). Okay on to the drive...
Car starts and idles like stock, except it seems slightly quieter. I have a very mild exhaust upgrade and you almost can't tell. If it wasn't for the Banks gauge (which I highly recommended for monitoring boost and temperatures), it would seem totally stock. I am not sure anyone would notice the car is modified when driving it around a low speed parking lot. It's totally OEM, and I cannot stress how impressive that is on car that has had a power increase or 50% or more. Once you pull out on a main road, a totally different personality emerges. As you pull pass 3K RPM towards 4K, the power surges wonderfully and predictably. Turbo noises become very present inside the cabin and become addicting, but never annoying, easily drowned out by music at moderate volume. Think of having the torque of a lightly modified turbo hot hatch, but in a RWD car 500+lbs lighter. Highway passing is now a breeze in 5th and 6th gear. There is plenty of power to throttle over-steer around corners in 2nd and 3rd. The NC chassis is awoken by the power increase and in combination with my suspension set up, is one of the best drivers cars I have driven at any price including many Porsches, BMWs, and recent muscle cars. If something happened to this car and I had to replace it, I'd be shopping for NCs to turbocharge with this kit the very next day. That is the best compliment I can give the Mazdaspeed NC Miata that could have been and Flyin Miata made possible.
Very Complete Kit, but a bit cramped on installation, and a little close to the brake lines, but a nice kit nonetheless. Bravo FM! Does going hard tube do anything to boost levels?
Thanks for the kind words! Our silicone intercooler hoses are lined with interwoven Nomex fibers, so they do not expand with boost pressure - even up to 30+ psi! We designed this kit using our flexible, custom-formed silicone intercooler hoses to make the installation as simple and lightweight as possible.
It might be more appropriate to say "son" project, as my 16-year-old did 95% of the work on my 2006 NC. I just assisted when he had questions or needed a second set of hands. He has good mechanical intuition but not much experience working on cars beyond oil changes. The fact that he was able to successfully complete the project is a testament to his abilities, as well as FM's excellent kit and thorough instructions.
Here are a few notes that might be helpful for others who are thinking about purchasing the kit:
1. The project was done at our home. We used a QuickJack portable car lift to complete the tasks under the vehicle. It might be possible to do the installation on jack stands, but the extra clearance (and safety) of the lift really helped.
2. I already had some of the hand tools required for the job, but I spent about $500 on additional tools, fluids, and supplies. A set of ratcheting box wrenches and several types and sizes of ratchets were needed to access tight spaces.
3. The factory cat was reused rather than purchasing a new one. I paid a local welder to come to the house and connect the cat to the adaptor ring.
4. Both the written instructions and the YouTube videos are very good. Just be aware that there can be some variability in the order of steps when referring to the two sources.
5. The most challenging part of the operation was removing and installing the MAP sensor. To assist with the reinstall, my son drew a circle with a paint pin around the screw hole so he could better see it with a mirror. He also temporarily superglued the torx bit to the screw head, so the fastener and bit would stay aligned while fiddling with the threading. This tip may help someone else with this tedious task.
6. The project took 2 weeks of intermittent work, probably about 40-50 hours in total. However, a leaking steering rack was also replaced during the process, which added to the time and complexity beyond just the turbo installation.
My son has been driving the car for two days now and reports it is fantastic! It was a long wait for FM to get this kit to market, but it was worth it.