Ecliptech Shift-P2 shift light
Ecliptech Shift-P2 shift light
Couldn't load pickup availability


Collapsible content
Description
We're big fans of sequential shift lights or LED tachs. They allow you to monitor your engine speed without having to take your eyes away from the road by lighting up a series of LEDs with engine speed. It's the same sort of thing you see built into $2000 race dashboards and $50,000 Formula 1 steering wheels.
The Ecliptech Shift-P2 and Shift-P2+ take our previous favorite - the Shift-i - and extends on it. The main LEDs are the primary attraction, lighting up in sequence as you approach the redline. You can select what that sequence looks like from a series of built-in options, or on the Shift-P2+ you can program your own. It'll dim itself at cruise so you're not blinded by high-intensity LEDs when you're not working the car hard. There's also a small display screen that can give you extra information such as battery voltage or programmable alerts. The Shift-P2+ also allows you to add an analog input to trigger alerts, such as an overheating or low oil pressure condition. All the programming can be done via the keys on the tach.
Due to the variations in the installation of this product, this kit does not come with any wiring connectors included. Basic NA/NB installations do not require any connectors to be installed. Basic NC/ND installations will require up to (3) t-taps or butt-connectors. More advanced installations for all generations will require additional t-taps or butt-connectors to be installed.
The Shift-P2 can be upgraded to the Shift-P2+ with a software key.
Works with all Miatas and most other vehicles.
Shipping
What does it fit?
Fits: 1990-1997, 1999-2005, 2004-2005 MSM, 2006-2015, 2007-2015 PRHT, 2016-2025, 2017-2020 Fiat, 2017-2025 RF
Emissions
Emissions do not apply.
Warranty
2 years
SKU
Works great but I did run into a slight hiccup with install but .... Flyin'Miata was right there to help and get me squared away! Great product and great support from Flyin' Miata
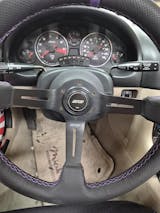
This little thing fits perfectly on the steering column cover (NB). It’s curved on the bottom ever so slightly, which matches the curvature on the column cover. Wiring was very easy following FM’s instructions.
This shift light is awesome, read instructions in package thoroughly otherwise it can be confusing
Hands down best shift light setup for miatas! Easy install 👌 and very satisfying results that I see with every drive 🚗 thanks Flyin' Miata you guys always are awesome!
I recently purchased a basic P2 shift-light package for my 2017 supercharged ND Miata. I had a definite purpose in making this purchase. I have a tendency to bump into the rev limiter while carrying out high-speed passes. This is very dangerous, suddenly losing power when your doing 85+ mph in a high speed passing situation. Moreover, I really don't want to take my eyes off the road to check the tach when passing at high speeds and auditory feedback (for me, at least) is unreliable. I bought the P2 shift light specifically to serve as a secondary warning stimulus in my peripheral vision. To make a long story short, installation went without any big problems, the mounting position was beautiful (centered in front of the tach on the downward sloping portion of the cover directly behind the steering wheel). Which brings me to my only complaint: the User's Instruction Guide is pretty poorly written, particularly in terms of the of the different programing options that are available to you the with the P2 vs. the more expensive P2+ model (available YouTube and company videos also sorta blow). Lucky for me, I was able to work out a simple solution to my problem ( I used the default G-A-R series starting it at 3,000 rpm and ending at 6500 rpm automatically making each of the seven lights equal to 500 rpm). However, I knew a lot, going in, about my car's particular power curve from prior dyno readings. In summary, if you want to do anything a whole lot more complicated than relatively straight forward stuff or to draw on the various multi-functions in the chip, you're probably better off buying the P2+, rather than the basic P2. For me the P2 was perfect, but you need to carefully consider exactly what you intend to do with this product and why you want it before choosing between the two options. Other than that, all thumbs up!


